原因

最近看到好多嵌入式操作系统都具有动态加载的相关功能,如Threadx和RT-Thread的moudle功能,但这些功能都与自身系统耦合很严重,大部分都要依赖于自己的工具链。考虑到MDK5使用的人最多,因此决定采用MDK5的相关工具链实现一个方便移植的动态加载实现。本程序中elf文件解析部分参照了RT-Thread的Moudle实现。实现过程中查阅了很多的资料,中间也遇到了蛮多的问题,索性最后都解决了。非常感谢硬汉大哥的文档教程,在里面学到了很多东西,本帖也算是我对论坛的一点点回馈,希望能帮助到有需要的人,相关代码与工程我都会放到附件中,供大家参考。

什么是动态加载?

按照程序的加载方式进行分类,可以分为静态加载和动态加载。静态加载是指所以程序代码都在编译期予以确定,所有程序都需要存储在ROM中,程序尺寸受限于flash的尺寸,运行速度较快,无需预加载。动态加载是在编译期间,依靠函数或者其他手段,从其他的存储介质中将程序加载ram中运行,与静态加载相比更加灵活,可以很方便的进行程序升级,可以把暂时不需要使用的库释放掉,在需要使用的时候在将其加载到内存中,程序尺寸可以做的很大,可以很方便的实现APP程序。

程序功能介绍

本程序实现的是在STM32中实现程序的动态加载,使用起来与windows的dll类似。程序使用dl_load_lib加载相应的库文件到句柄中,加载成功后可使用dl_get_func,通过函数名获得相应函数指针,在不需要使用时可使用dl_destroy_lib对句柄进行释放。

程序使用平台介绍

本程序使用软件平台位MDK5的V6编译器,语法标准采用C99,移植了FATFS作为文件系统,使用楼主自己编写的内存管理函数进行动态内存的管理,硬件平台位STM32H743。

内存管理算法

论坛首发,内存管理算法,支持malloc,realloc,align_alloc,配有内存碎片合并算法(v1.2)
(出处: 硬汉嵌入式论坛)

本次算法进行了部分更新,主要添加内存池式的初始化与分配方法,与硬汉哥在H7教程中的内存管理方法使用方式完全一致,另外代码是根据C99标准编写的,因此编译时需要勾选C99选项。
mem_manage.h

1
2
3
4
5
6
7
8
9
10
11
12
13
14
15
16
17
18
19
20
21
22
23
24
25
26
27
28
29
30
31
32
33
34
35
36
37
38
39
40
41
42
43
44
45
46
47
48
49
50
51
52
53
54
55
56
57
58
59
60
61
62
63
64
65
66
67
68
69
70
71
72
73
74
75
76
77
78
79
80
81
82
83
84
85
86
87
88
89
90
91
92
93
94
95
96
97
98
99
100
101
102
103
104
105
/********************************************************************************
* @File name: mem_manage.h
* @Author: wzh
* @Version: 1.2
* @Date: 2021-9-3
* @Description: 内存管理算法,带有内存碎片合并算法,支持malloc、align_alloc、
* realloc、free等常见的内存管理函数,支持多块内存合并管理
*更新记录:
* v1.0 2021-8-13 添加Mem_Manage_Heap_Init、Mem_Manage_Malloc、Mem_Manage_Realloc
Mem_Manage_Aligned_Alloc函数
v1.1 2021-8-14 添加Mem_Manage_Get_State函数
v1.2 2021-9-3 更改Mem_Root结构体成员;更改Mem_State结构体成员;
添加枚举类型Mem_Err_Type;将函数Mem_Manage_Heap_Init重命名为
Mem_Manage_Init;修改Mem_Manage_Init函数声明;添加函数Mem_Manage_Get_Total_Size、
Mem_Manage_Get_Remain_Size、Mem_Manage_Get_Errflag、Mem_Manage_Pool_Init、
Mem_Manage_Pool_Malloc、Mem_Manage_Pool_Realloc、Mem_Manage_Pool_Aligned_Alloc、
Mem_Manage_Pool_Free、Mem_Manage_Pool_Get_State、Mem_Manage_Pool_Get_Total_Size、
Mem_Manage_Pool_Get_Remain_Size、Mem_Manage_Pool_Get_Errflag;
* @Todo 具体使用方法如下
* 1、使用Mem_Manage_Init(Mem_Root* pRoot, const Mem_Region* pRigon)初始化
* 内存区,pRoot为句柄,pRigon描述了内存区个数以及内个内存区起始地址和大小
* pRigon的格式如下
* const Mem_Region pRigon[]=
* {
* (void*)(0x20000000),512*1024,
* (void*)(0x80000000),256*1024,
* ....
* NULL,0
* }
* 注意地址必需由低到高排列,同时使用NULL,0标识结尾,内存区容量不要太小,至少大于64个字节
* 2、使用Mem_Manage_Malloc、Mem_Manage_Realloc、Mem_Manage_Aligned_Alloc进行内存
* 分配,其中Mem_Manage_Malloc、Mem_Manage_Realloc默认均为8字节对齐,可修改
* .c文件中的宏定义修改,Mem_Manage_Aligned_Alloc可以指定地址对齐,但对齐的参数
* 有限制,align_size需要为2的整数次幂,否则会直接返回NULL。
* 3、内存使用完毕后使用Mem_Manage_Free进行内存释放
* 4、可通过Mem_Manage_Get_State查看空闲内存状态,通过Mem_Manage_Get_Total_Size获取总内存,
* 通过Mem_Manage_Get_Remain_Size获取剩余内存
* 5、算法管理的单个内存上限为2GB(32位机)
********************************************************************************/
#ifndef MEM_MANAGE_H_
#define MEM_MANAGE_H_

#include <stddef.h>
#include <stdbool.h>

#ifdef __cplusplus
extern "C" {
#endif

typedef enum {
MEM_NO_ERR=0X1234, //无错误
MEM_NO_INIT=0, //内存区未初始化
MEM_OVER_WRITE=1 //内存区节点信息位置数据损坏
}Mem_Err_Type;

typedef struct Mem_Region {
void* addr;//内存区起始地址
size_t mem_size;//内存大小
}Mem_Region;

typedef struct Mem_Node {
struct Mem_Node* next_node;
size_t mem_size;
}Mem_Node;

typedef struct Mem_Root {
Mem_Node* pStart;
Mem_Node* pEnd;
size_t total_size; //总内存
size_t remain_size; //剩余内存
Mem_Err_Type err_flag; //错误标记
}Mem_Root;

typedef struct Mem_State {
size_t free_node_num; //空闲节点个数
size_t max_node_size; //最大节点内存
size_t min_node_size; //最小节点内存
}Mem_State;


bool Mem_Manage_Init(Mem_Root* pRoot, const Mem_Region* pRigon);
void* Mem_Manage_Malloc(Mem_Root* pRoot, size_t want_size);
void* Mem_Manage_Realloc(Mem_Root* pRoot, void* src_addr, size_t want_size);
void* Mem_Manage_Aligned_Alloc(Mem_Root* pRoot, size_t align_size, size_t want_size);
void Mem_Manage_Free(Mem_Root* pRoot, void* addr);
void Mem_Manage_Get_State(Mem_Root* pRoot, Mem_State* pState);
size_t Mem_Manage_Get_Total_Size(const Mem_Root* pRoot);
size_t Mem_Manage_Get_Remain_Size(const Mem_Root* pRoot);
Mem_Err_Type Mem_Manage_Get_Errflag(const Mem_Root* pRoot);

bool Mem_Manage_Pool_Init(void* mem_addr,size_t mem_size);
void* Mem_Manage_Pool_Malloc(void* mem_addr,size_t want_size);
void* Mem_Manage_Pool_Realloc(void* mem_addr,void* src_addr,size_t want_size);
void* Mem_Manage_Pool_Aligned_Alloc(void* mem_addr,size_t align_byte,size_t want_size);
void Mem_Manage_Pool_Free(void* mem_addr,void* free_addr);
void Mem_Manage_Pool_Get_State(void* mem_addr,Mem_State* pState);
size_t Mem_Manage_Pool_Get_Total_Size(const void* mem_addr);
size_t Mem_Manage_Pool_Get_Remain_Size(const void* mem_addr);
Mem_Err_Type Mem_Manage_Pool_Get_Errflag(const void* mem_addr);

#ifdef __cplusplus
}
#endif

#endif

mem_manage.h

1
2
3
4
5
6
7
8
9
10
11
12
13
14
15
16
17
18
19
20
21
22
23
24
25
26
27
28
29
30
31
32
33
34
35
36
37
38
39
40
41
42
43
44
45
46
47
48
49
50
51
52
53
54
55
56
57
58
59
60
61
62
63
64
65
66
67
68
69
70
71
72
73
74
75
76
77
78
79
80
81
82
83
84
85
86
87
88
89
90
91
92
93
94
95
96
97
98
99
100
101
102
103
104
105
106
107
108
109
110
111
112
113
114
115
116
117
118
119
120
121
122
123
124
125
126
127
128
129
130
131
132
133
134
135
136
137
138
139
140
141
142
143
144
145
146
147
148
149
150
151
152
153
154
155
156
157
158
159
160
161
162
163
164
165
166
167
168
169
170
171
172
173
174
175
176
177
178
179
180
181
182
183
184
185
186
187
188
189
190
191
192
193
194
195
196
197
198
199
200
201
202
203
204
205
206
207
208
209
210
211
212
213
214
215
216
217
218
219
220
221
222
223
224
225
226
227
228
229
230
231
232
233
234
235
236
237
238
239
240
241
242
243
244
245
246
247
248
249
250
251
252
253
254
255
256
257
258
259
260
261
262
263
264
265
266
267
268
269
270
271
272
273
274
275
276
277
278
279
280
281
282
283
284
285
286
287
288
289
290
291
292
293
294
295
296
297
298
299
300
301
302
303
304
305
306
307
308
309
310
311
312
313
314
315
316
317
318
319
320
321
322
323
324
325
326
327
328
329
330
331
332
333
334
335
336
337
338
339
340
341
342
343
344
345
346
347
348
349
350
351
352
353
354
355
356
357
358
359
360
361
362
363
364
365
366
367
368
369
370
371
372
373
374
375
376
377
378
379
380
381
382
383
384
385
386
387
388
389
390
391
392
393
394
395
396
397
398
399
400
401
402
403
404
405
406
407
408
409
410
411
412
413
414
415
416
417
418
419
420
421
422
423
424
425
426
427
428
429
430
431
432
433
434
435
436
437
438
439
440
441
442
443
444
445
446
447
448
449
450
451
452
453
454
455
456
457
458
459
460
461
462
463
464
465
466
467
468
469
470
471
472
473
474
475
476
477
478
479
480
481
482
483
484
485
486
487
488
489
490
491
492
493
494
495
496
497
498
499
500
501
502
503
504
505
506
507
508
509
510
511
512
513
514
515
516
517
518
519
520
521
522
523
524
525
526
527
528
529
530
531
532
533
534
535
536
537
538
539
540
541
542
543
544
545
546
547
548
/********************************************************************************
* @File name: mem_manage.c
* @Author: wzh
* @Version: 1.2
* @Date: 2021-9-3
* @Description: 内存管理算法,带有内存碎片合并算法,支持malloc、align_alloc、
* realloc、free等常见的内存管理函数,支持多块内存合并管理
*更新记录:
* v1.0 2021-8-13 添加Mem_Manage_Heap_Init、Mem_Manage_Malloc、Mem_Manage_Realloc
Mem_Manage_Aligned_Alloc函数
v1.1 2021-8-14 添加Mem_Manage_Get_State函数
v1.2 2021-9-3 更改Mem_Root结构体成员;更改Mem_State结构体成员;
添加枚举类型Mem_Err_Type;将函数Mem_Manage_Heap_Init重命名为
Mem_Manage_Init;修改Mem_Manage_Init函数声明;添加函数Mem_Manage_Get_Total_Size、
Mem_Manage_Get_Remain_Size、Mem_Manage_Get_Errflag、Mem_Manage_Pool_Init、
Mem_Manage_Pool_Malloc、Mem_Manage_Pool_Realloc、Mem_Manage_Pool_Aligned_Alloc、
Mem_Manage_Pool_Free、Mem_Manage_Pool_Get_State、Mem_Manage_Pool_Get_Total_Size、
Mem_Manage_Pool_Get_Remain_Size、Mem_Manage_Pool_Get_Errflag;
********************************************************************************/
#include <stdint.h>
#include <string.h>
#include "mem_manage.h"

#define MEM_MANAGE_ALIGNMENT_BYTE_DEFAULT 8
#define MEM_MANAGE_BITS_PER_BYTE 8
#define MEM_MANAGE_MEM_STRUCT_SIZE Mem_Manage_Align_Up(sizeof(Mem_Node),MEM_MANAGE_ALIGNMENT_BYTE_DEFAULT)
#define MEM_MANAGE_MINUM_MEM_SIZE (MEM_MANAGE_MEM_STRUCT_SIZE<<1)
#define MEM_MANAGE_ALLOCA_LABAL ((size_t)(1<<(sizeof(size_t)*MEM_MANAGE_BITS_PER_BYTE-1)))
#define MEM_MANAGE_MINUM_NODE_SIZE (MEM_MANAGE_MEM_STRUCT_SIZE+MEM_MANAGE_MINUM_MEM_SIZE)
#define MEM_MANAGE_MEM_ROOT_SIZE Mem_Manage_Align_Up(sizeof(Mem_Root),MEM_MANAGE_ALIGNMENT_BYTE_DEFAULT)

static __inline size_t Mem_Manage_Align_Down(size_t data, size_t align_byte) {
return data&~(align_byte - 1);
}

static __inline size_t Mem_Manage_Align_Up(size_t data, size_t align_byte) {
return (data + align_byte - 1)&~(align_byte - 1);
}

static __inline Mem_Node* Mem_Manage_Addr_To_Mem(const void* addr) {
return (Mem_Node*)((const uint8_t*)addr - MEM_MANAGE_MEM_STRUCT_SIZE);
}

static __inline void* Mem_Manage_Mem_To_Addr(const Mem_Node* mem_node) {
return (void*)((const uint8_t*)mem_node + MEM_MANAGE_MEM_STRUCT_SIZE);
}

//将内存节点插入空闲列表中
static __inline void Mem_Insert_Node_To_FreeList(Mem_Root* pRoot, Mem_Node* pNode) {
Mem_Node* pPriv_Node;
Mem_Node* pNext_Node;
//寻找地址与pNode相近的节点
for (pPriv_Node = pRoot->pStart; pPriv_Node->next_node < pNode; pPriv_Node = pPriv_Node->next_node);
pNext_Node = pPriv_Node->next_node;
pRoot->remain_size += pNode->mem_size;
//尝试pNode与前一个块进行合并
if ((uint8_t*)Mem_Manage_Mem_To_Addr(pPriv_Node) + pPriv_Node->mem_size == (uint8_t*)pNode) {
if (pPriv_Node != pRoot->pStart) {//不是Start块的话可以合并
pPriv_Node->mem_size += MEM_MANAGE_MEM_STRUCT_SIZE + pNode->mem_size;
pRoot->remain_size += MEM_MANAGE_MEM_STRUCT_SIZE;
pNode = pPriv_Node;
}
else {//后面如果是Start块不进行合并,以免浪费内存
pRoot->pStart->next_node = pNode;
}
}
else {//不能合并时直接插入到空闲单链表中
pPriv_Node->next_node = pNode;
}
//尝试后面一个块与pNode进行合并
if ((uint8_t*)Mem_Manage_Mem_To_Addr(pNode) + pNode->mem_size == (uint8_t*)pNext_Node) {
if (pNext_Node != pRoot->pEnd) {//不是end块的话可以进行块合并
pNode->mem_size += MEM_MANAGE_MEM_STRUCT_SIZE + pNext_Node->mem_size;
pRoot->remain_size += MEM_MANAGE_MEM_STRUCT_SIZE;
pNode->next_node = pNext_Node->next_node;
}
else {//后面如果是end块不进行合并,以免浪费内存
pNode->next_node = pRoot->pEnd;
}
}
else {//不能合并时直接插入到空闲单链表中
pNode->next_node = pNext_Node;
}
}

static __inline void Mem_Settle(Mem_Root* pRoot){
Mem_Node* pNode=pRoot->pStart->next_node;
while(pNode->next_node!=pRoot->pEnd){
if((uint8_t*)Mem_Manage_Mem_To_Addr(pNode)+pNode->mem_size==(uint8_t*)pNode->next_node){
pNode->mem_size += MEM_MANAGE_MEM_STRUCT_SIZE+pNode->next_node->mem_size;
pRoot->remain_size += MEM_MANAGE_MEM_STRUCT_SIZE;
pNode->next_node=pNode->next_node->next_node;
}
else
pNode=pNode->next_node;
}
}

//获取管理内存的状态
//pRoot:句柄指针
//pState:状态信息结构体指针
//return:无返回值
void Mem_Manage_Get_State(Mem_Root* pRoot,Mem_State* pState) {

if(pRoot->err_flag!=MEM_NO_ERR){
pState->free_node_num=0;
pState->max_node_size=0;
pState->min_node_size=0;
return;
}

if(pRoot->pStart==NULL||pRoot->pEnd==NULL){
pRoot->err_flag=MEM_NO_INIT;
pState->free_node_num=0;
pState->max_node_size=0;
pState->min_node_size=0;
return;
}
pState->max_node_size = pRoot->pStart->next_node->mem_size;
pState->min_node_size = pRoot->pStart->next_node->mem_size;
pState->free_node_num = 0;
for (Mem_Node* pNode = pRoot->pStart->next_node; pNode->next_node != NULL; pNode = pNode->next_node) {
pState->free_node_num ++;
if (pNode->mem_size > pState->max_node_size)
pState->max_node_size = pNode->mem_size;
if (pNode->mem_size < pState->min_node_size)
pState->min_node_size = pNode->mem_size;
}
}

//与C库函数aligned_alloc作用一致
//pRoot:句柄指针
//align_size:期望分配的内存几字节对齐(8、16、32...)
//want_size:期望分配内存大小
//return: NULL 分配失败(内存不足或者错误标记不为MEM_NO_ERR);
// 其他值 分配成功
void* Mem_Manage_Aligned_Alloc(Mem_Root* pRoot,size_t align_size, size_t want_size) {
void* pReturn = NULL;
Mem_Node* pPriv_Node,*pNow_Node;

if(pRoot->err_flag!=MEM_NO_ERR){
return NULL;
}

if(pRoot->pStart==NULL||pRoot->pEnd==NULL){
pRoot->err_flag=MEM_NO_INIT;
return NULL;
}

if (want_size == 0) {
return NULL;
}

if ((want_size&MEM_MANAGE_ALLOCA_LABAL) != 0) {//内存过大
return NULL;
}

if (align_size&(align_size - 1)) {//内存对齐输入非法值
return NULL;
}

if (want_size < MEM_MANAGE_MINUM_MEM_SIZE)
want_size = MEM_MANAGE_MINUM_MEM_SIZE;
if (align_size < MEM_MANAGE_ALIGNMENT_BYTE_DEFAULT)
align_size = MEM_MANAGE_ALIGNMENT_BYTE_DEFAULT;
//确保分配的单元都是MEM_MANAGE_ALIGNMENT_BYTE_DEFAULT的整数倍
want_size = Mem_Manage_Align_Up(want_size, MEM_MANAGE_ALIGNMENT_BYTE_DEFAULT);

pPriv_Node = pRoot->pStart;
pNow_Node = pRoot->pStart->next_node;

while (pNow_Node->next_node != NULL) {
if (pNow_Node->mem_size >= want_size+ MEM_MANAGE_MEM_STRUCT_SIZE) {
size_t use_align_size;
size_t new_size;
pReturn = (void*)Mem_Manage_Align_Up((size_t)Mem_Manage_Mem_To_Addr(pNow_Node), align_size);//计算出对齐的地址
use_align_size = (uint8_t*)pReturn-(uint8_t*)Mem_Manage_Mem_To_Addr(pNow_Node);//计算对齐所消耗的内存
if (use_align_size != 0) {//内存不对齐
if (use_align_size < MEM_MANAGE_MINUM_NODE_SIZE) {//不对齐的值过小
pReturn = (void*)Mem_Manage_Align_Up(\
(size_t)Mem_Manage_Mem_To_Addr(pNow_Node)+ MEM_MANAGE_MINUM_NODE_SIZE, align_size);
use_align_size = (uint8_t*)pReturn - (uint8_t*)Mem_Manage_Mem_To_Addr(pNow_Node);
}
if (use_align_size <= pNow_Node->mem_size) {
new_size = pNow_Node->mem_size - use_align_size;//计算去除对齐消耗的内存剩下的内存大小
if (new_size >= want_size) {//满足条件,可以进行分配
Mem_Node* pNew_Node = Mem_Manage_Addr_To_Mem(pReturn);
pNow_Node->mem_size -= new_size + MEM_MANAGE_MEM_STRUCT_SIZE;//分裂节点
pRoot->remain_size -= new_size + MEM_MANAGE_MEM_STRUCT_SIZE;
pNew_Node->mem_size = new_size;//新节点本来也不在空闲链表中,不用从空闲链表中排出
pNew_Node->next_node = (Mem_Node*)MEM_NO_ERR;
pNow_Node = pNew_Node;
break;
}
}
}
else {//内存直接就是对齐的
pPriv_Node->next_node = pNow_Node->next_node;//排出空闲链表
pNow_Node->next_node = (Mem_Node*)MEM_NO_ERR;
pRoot->remain_size -= pNow_Node->mem_size;
break;
}
}
pPriv_Node = pNow_Node;
pNow_Node = pNow_Node->next_node;
}

if (pNow_Node->next_node == NULL){//分配失败
if(pNow_Node!=pRoot->pEnd){
pRoot->err_flag=MEM_OVER_WRITE;
}
return NULL;
}
pNow_Node->next_node = NULL;
if (pNow_Node->mem_size >= MEM_MANAGE_MINUM_NODE_SIZE + want_size) {//节点内存还有富余
Mem_Node* pNew_Node =(Mem_Node*)((uint8_t*)Mem_Manage_Mem_To_Addr(pNow_Node) + want_size);//计算将要移入空闲链表的节点地址
pNew_Node->mem_size = pNow_Node->mem_size - want_size - MEM_MANAGE_MEM_STRUCT_SIZE;
pNew_Node->next_node = NULL;
pNow_Node->mem_size = want_size;
Mem_Insert_Node_To_FreeList(pRoot, pNew_Node);
}
pNow_Node->mem_size |= MEM_MANAGE_ALLOCA_LABAL;//标记内存已分配
return pReturn;
}

//与C库函数malloc作用相同
//pRoot:句柄指针
//want_size:期望分配内存大小
//return: NULL 分配失败(内存不足或者错误标记不为MEM_NO_ERR);
// 其他值 分配成功
void* Mem_Manage_Malloc(Mem_Root* pRoot, size_t want_size) {
return Mem_Manage_Aligned_Alloc(pRoot, MEM_MANAGE_ALIGNMENT_BYTE_DEFAULT, want_size);
}

//与C库函数realloc作用相同
//pRoot:句柄指针
//src_addr:源地址指针
//want_size:期望分配内存大小
//return: NULL 分配失败(内存不足或者句柄错误标记不为MEM_NO_ERR);
// 其他值 分配成功
void* Mem_Manage_Realloc(Mem_Root* pRoot, void* src_addr, size_t want_size) {
void* pReturn = NULL;
Mem_Node* pNext_Node,*pPriv_Node;
Mem_Node* pSrc_Node;

if(pRoot->err_flag!=MEM_NO_ERR){
return NULL;
}

if(pRoot->pStart==NULL||pRoot->pEnd==NULL){
pRoot->err_flag=MEM_NO_INIT;
return NULL;
}

if (src_addr == NULL) {
return Mem_Manage_Aligned_Alloc(pRoot, MEM_MANAGE_ALIGNMENT_BYTE_DEFAULT, want_size);
}
if (want_size == 0) {
Mem_Manage_Free(pRoot, src_addr);
return NULL;
}

if ((want_size&MEM_MANAGE_ALLOCA_LABAL) != 0){
return NULL;
}

pSrc_Node = Mem_Manage_Addr_To_Mem(src_addr);

if ((pSrc_Node->mem_size&MEM_MANAGE_ALLOCA_LABAL) == 0) {//源地址未被分配,调用错误
pRoot->err_flag=MEM_OVER_WRITE;
return NULL;
}

pSrc_Node->mem_size &= ~MEM_MANAGE_ALLOCA_LABAL;//清除分配标记
if (pSrc_Node->mem_size >= want_size) {//块预留地址足够大
pSrc_Node->mem_size |= MEM_MANAGE_ALLOCA_LABAL;//恢复分配标记
pReturn = src_addr;
return pReturn;
}
//开始在空闲列表中寻找与本块相近的块
for (pPriv_Node = pRoot->pStart; pPriv_Node->next_node <pSrc_Node; pPriv_Node = pPriv_Node->next_node);
pNext_Node = pPriv_Node->next_node;

if (pNext_Node != pRoot->pEnd && \
((uint8_t*)src_addr + pSrc_Node->mem_size == (uint8_t*)pNext_Node) && \
(pSrc_Node->mem_size + pNext_Node->mem_size + MEM_MANAGE_MEM_STRUCT_SIZE >= want_size)) {
//满足下一节点非end,内存连续,内存剩余足够
pReturn = src_addr;
pPriv_Node->next_node = pNext_Node->next_node;//排出空闲列表
pRoot->remain_size -= pNext_Node->mem_size;
pSrc_Node->mem_size += MEM_MANAGE_MEM_STRUCT_SIZE + pNext_Node->mem_size;
want_size = Mem_Manage_Align_Up(want_size, MEM_MANAGE_ALIGNMENT_BYTE_DEFAULT);
if (pSrc_Node->mem_size >= MEM_MANAGE_MINUM_NODE_SIZE+ want_size) {//去除分配的剩余空间足够开辟新块
Mem_Node* pNew_Node = (Mem_Node*)((uint8_t*)Mem_Manage_Mem_To_Addr(pSrc_Node) + want_size);
pNew_Node->next_node = NULL;
pNew_Node->mem_size = pSrc_Node->mem_size - want_size - MEM_MANAGE_MEM_STRUCT_SIZE;
pSrc_Node->mem_size = want_size;
Mem_Insert_Node_To_FreeList(pRoot, pNew_Node);
}
pSrc_Node->mem_size |= MEM_MANAGE_ALLOCA_LABAL;//恢复分配标记
}
else {
pReturn = Mem_Manage_Aligned_Alloc(pRoot, MEM_MANAGE_ALIGNMENT_BYTE_DEFAULT, want_size);
if (pReturn == NULL){
pSrc_Node->mem_size |= MEM_MANAGE_ALLOCA_LABAL;//恢复分配标记
return NULL;
}
memcpy(pReturn, src_addr, pSrc_Node->mem_size);
pSrc_Node->mem_size |= MEM_MANAGE_ALLOCA_LABAL;//恢复分配标记
Mem_Manage_Free(pRoot, src_addr);
}
return pReturn;
}

//与C库函数free作用一致
//pRoot:句柄指针
//addr:释放内存的首地址
//return:无返回值
void Mem_Manage_Free(Mem_Root* pRoot,void* addr) {
Mem_Node* pFree_Node;

if(pRoot->err_flag!=MEM_NO_ERR){
return;
}

if(pRoot->pStart==NULL||pRoot->pEnd==NULL){
pRoot->err_flag=MEM_NO_INIT;
return;
}

if (addr == NULL) {
return;
}
pFree_Node = Mem_Manage_Addr_To_Mem(addr);

if ((pFree_Node->mem_size&MEM_MANAGE_ALLOCA_LABAL) == 0) {//释放错误,没有标记
pRoot->err_flag=MEM_OVER_WRITE;
return;
}

if (pFree_Node->next_node != NULL) {//释放错误
pRoot->err_flag=MEM_OVER_WRITE;
return;
}
pFree_Node->mem_size &= ~MEM_MANAGE_ALLOCA_LABAL;//清除分配标记
Mem_Insert_Node_To_FreeList(pRoot, pFree_Node);//插入到空闲链表中
}

//获取句柄管理的内存区总容量
//pRoot:句柄指针
//return:内存区总容量(单位:byte)
size_t Mem_Manage_Get_Total_Size(const Mem_Root* pRoot){
return pRoot->total_size;
}

//获取句柄管理的内存区剩余容量
//pRoot:句柄指针
//return:内存区剩余容量(单位:byte)
size_t Mem_Manage_Get_Remain_Size(const Mem_Root* pRoot){
return pRoot->remain_size;
}

//获取句柄管理的内存区错误标记
//pRoot:句柄指针
//return:错误标记
Mem_Err_Type Mem_Manage_Get_Errflag(const Mem_Root* pRoot){
return pRoot->err_flag;
}

//内存管理句柄初始化
//pRoot:句柄指针
//pRigon:内存区结构体指针
//return: true 初始化成功;
// false 初始化失败
bool Mem_Manage_Init(Mem_Root* pRoot,const Mem_Region* pRegion) {
Mem_Node* align_addr;
size_t align_size;
Mem_Node* pPriv_node=NULL;

pRoot->total_size = 0;
pRoot->pEnd = NULL;
pRoot->pStart = NULL;
pRoot->err_flag = MEM_NO_INIT;
pRoot->remain_size = 0;
for (; pRegion->addr != NULL; pRegion++) {
align_addr = (Mem_Node*)Mem_Manage_Align_Up((size_t)pRegion->addr, MEM_MANAGE_ALIGNMENT_BYTE_DEFAULT);//计算内存块对齐后的地址
if ((uint8_t*)align_addr > pRegion->mem_size+ (uint8_t*)pRegion->addr)//对齐消耗的内存超过内存区
continue;
align_size = pRegion->mem_size - ((uint8_t*)align_addr - (uint8_t*)pRegion->addr);//计算对齐后剩下的内存大小
if (align_size < MEM_MANAGE_MINUM_MEM_SIZE+ MEM_MANAGE_MEM_STRUCT_SIZE)//对齐剩下的内存太小
continue;
align_size -= MEM_MANAGE_MEM_STRUCT_SIZE;//求除去掉表头后内存块的大小
align_addr->mem_size = align_size;
align_addr->next_node = NULL;
if (pRoot->pStart == NULL) {//如果是初始化
pRoot->pStart = align_addr;//将当前内存块地址记为start
if (align_size >= MEM_MANAGE_MINUM_MEM_SIZE+ MEM_MANAGE_MEM_STRUCT_SIZE) {//若剩下的块足够大
align_size -= MEM_MANAGE_MEM_STRUCT_SIZE;//去掉下一个块的表头剩下的内存大小
align_addr = (Mem_Node*)((uint8_t*)pRoot->pStart + MEM_MANAGE_MEM_STRUCT_SIZE);//下一个块的表头地址
align_addr->mem_size = align_size;
align_addr->next_node = NULL;
pRoot->pStart->mem_size = 0;
pRoot->pStart->next_node = align_addr;
pRoot->total_size = align_addr->mem_size;
}
else {//内存太小了,将当前内存块地址记为start
pRoot->total_size = 0;
pRoot->pStart->mem_size = 0;
}
}
else {
if (pPriv_node == NULL) {
pRoot->err_flag = MEM_NO_INIT;
return false;
}
pPriv_node->next_node = align_addr;//更新上一节点的next_node
pRoot->total_size += align_size;
}
pPriv_node = align_addr;
}
if (pPriv_node == NULL) {
pRoot->err_flag = MEM_NO_INIT;
return false;
}
//此时,pPriv_node为最后一个块,接下来在块尾放置表尾end
//求出放置end块的地址,end块仅是方便遍历使用,因此尽量小,分配为MEM_MANAGE_MEM_STRUCT_SIZE
align_addr = (Mem_Node*)Mem_Manage_Align_Down(\
(size_t)Mem_Manage_Mem_To_Addr(pPriv_node) + pPriv_node->mem_size - MEM_MANAGE_MEM_STRUCT_SIZE, MEM_MANAGE_ALIGNMENT_BYTE_DEFAULT);
align_size = (uint8_t*)align_addr-(uint8_t*)Mem_Manage_Mem_To_Addr(pPriv_node);//求出分配出end块后,前一个块剩余大小
if (align_size >= MEM_MANAGE_MINUM_MEM_SIZE) {//若剩下的块足够大
pRoot->total_size -= pPriv_node->mem_size - align_size;//去掉分配end块消耗的内存
pRoot->pEnd = align_addr; //更新表尾的地址
pPriv_node->next_node = align_addr;
pPriv_node->mem_size = align_size;
align_addr->next_node = NULL;
align_addr->mem_size = 0;//end块不参与内存分配,因此直接为0就可以
}
else {//最后一个块太小了,直接作为end块
pRoot->pEnd = pPriv_node;
pRoot->total_size -= pPriv_node->mem_size;
}
if(pRoot->pStart==NULL||pRoot->pEnd==NULL){
pRoot->err_flag=MEM_NO_INIT;
return false;
}
Mem_Settle(pRoot);
pRoot->err_flag=MEM_NO_ERR;
pRoot->remain_size=pRoot->total_size;
return true;
}

//内存池初始化
//mem_addr:内存池首地址
//mem_size:内存池大小
//return: true 初始化成功;
// false 初始化失败
bool Mem_Manage_Pool_Init(void* mem_addr,size_t mem_size){
void* paddr=(uint8_t*)Mem_Manage_Align_Up((size_t)mem_addr,MEM_MANAGE_ALIGNMENT_BYTE_DEFAULT)+MEM_MANAGE_MEM_ROOT_SIZE;
Mem_Root* root_addr=(Mem_Root*)Mem_Manage_Align_Up((size_t)mem_addr,MEM_MANAGE_ALIGNMENT_BYTE_DEFAULT);
size_t align_size=(uint8_t*)paddr-(uint8_t*)mem_addr;
Mem_Region buf_region[]={
0,0,
NULL,0
};
if(mem_size<align_size)
return 0;
mem_size-=align_size;
if(mem_size<2*MEM_MANAGE_MEM_STRUCT_SIZE+MEM_MANAGE_MINUM_NODE_SIZE)
return 0;
buf_region[0].addr=paddr;
buf_region[0].mem_size=mem_size;
return Mem_Manage_Init(root_addr,buf_region);
}

//与C库函数malloc作用相同
//mem_addr:内存池首地址
//want_size:期望分配内存大小
//return: NULL 分配失败(内存不足或者错误标记不为MEM_NO_ERR);
// 其他值 分配成功
void* Mem_Manage_Pool_Malloc(void* mem_addr,size_t want_size){
Mem_Root* root_addr=(Mem_Root*)Mem_Manage_Align_Up((size_t)mem_addr,MEM_MANAGE_ALIGNMENT_BYTE_DEFAULT);
return Mem_Manage_Malloc(root_addr,want_size);
}

//与C库函数realloc作用相同
//mem_addr:内存池首地址
//src_addr:源地址指针
//want_size:期望分配内存大小
//return: NULL 分配失败(内存不足或者错误标记不为MEM_NO_ERR);
// 其他值 分配成功
void* Mem_Manage_Pool_Realloc(void* mem_addr,void* src_addr,size_t want_size){
Mem_Root* root_addr=(Mem_Root*)Mem_Manage_Align_Up((size_t)mem_addr,MEM_MANAGE_ALIGNMENT_BYTE_DEFAULT);
return Mem_Manage_Realloc(root_addr,src_addr,want_size);
}

//与C库函数aligned_alloc作用一致
//mem_addr:内存池首地址
//align_size:期望分配的内存几字节对齐(8、16、32...)
//want_size:期望分配内存大小
//return: NULL 分配失败(内存不足或者句柄错误标记不为MEM_NO_ERR);
// 其他值 分配成功
void* Mem_Manage_Pool_Aligned_Alloc(void* mem_addr,size_t align_byte,size_t want_size){
Mem_Root* root_addr=(Mem_Root*)Mem_Manage_Align_Up((size_t)mem_addr,MEM_MANAGE_ALIGNMENT_BYTE_DEFAULT);
return Mem_Manage_Aligned_Alloc(root_addr,align_byte,want_size);
}

//与C库函数free作用一致
//mem_addr:内存池首地址
//free_addr:释放内存的首地址
//return:无返回值
void Mem_Manage_Pool_Free(void* mem_addr,void* free_addr){
Mem_Root* root_addr=(Mem_Root*)Mem_Manage_Align_Up((size_t)mem_addr,MEM_MANAGE_ALIGNMENT_BYTE_DEFAULT);
Mem_Manage_Free(root_addr,free_addr);
}

//获取内存池的状态
//mem_addr:内存池首地址
//pState:状态信息结构体指针
//return:无返回值
void Mem_Manage_Pool_Get_State(void* mem_addr,Mem_State* pState){
Mem_Root* root_addr=(Mem_Root*)Mem_Manage_Align_Up((size_t)mem_addr,MEM_MANAGE_ALIGNMENT_BYTE_DEFAULT);
Mem_Manage_Get_State(root_addr,pState);
}

//获取内存池总容量
//mem_addr:内存池首地址
//return:内存区总容量(单位:byte)
size_t Mem_Manage_Pool_Get_Total_Size(const void* mem_addr){
Mem_Root* root_addr=(Mem_Root*)Mem_Manage_Align_Up((size_t)mem_addr,MEM_MANAGE_ALIGNMENT_BYTE_DEFAULT);
return Mem_Manage_Get_Total_Size(root_addr);
}

//获取内存池剩余容量
//mem_addr:内存池首地址
//return:内存区剩余容量(单位:byte)
size_t Mem_Manage_Pool_Get_Remain_Size(const void* mem_addr){
Mem_Root* root_addr=(Mem_Root*)Mem_Manage_Align_Up((size_t)mem_addr,MEM_MANAGE_ALIGNMENT_BYTE_DEFAULT);
return Mem_Manage_Get_Remain_Size(root_addr);
}

//获取内存池错误标记
//mem_addr:内存池首地址
//return:错误标记
Mem_Err_Type Mem_Manage_Pool_Get_Errflag(const void* mem_addr){
Mem_Root* root_addr=(Mem_Root*)Mem_Manage_Align_Up((size_t)mem_addr,MEM_MANAGE_ALIGNMENT_BYTE_DEFAULT);
return Mem_Manage_Get_Errflag(root_addr);
}

文档说明:内存管理设计文档.pdf

实现原理简介

实现STM32动态加载的问题主要有以下几个:

  • 问题1:被动态加载的APP程序中,程序的基地址是伴随着动态内存变化的,这样就会产生重定位问题,APP中定义数据的地址也会随着程序基地址的改变而改变,如何将这种改变正确的传入到APP程序中?
    解决方案:在我们编程时,编译输出的文件都有一种共同的文件格式:elf文件格式,elf文件格式有很多,其中有的elf文件中,携带了便于实现动态加载的相关信息,可以将重定位操作对代码的影响位置与影响方式以表格的形式表示,Windows,Linux也都是使用这种elf文件实现程序动态加载的。通过对这种特殊的elf文件进行解析,即可实现APP代码的相关数据的重定位。

  • 问题2:如何生成这样特殊的elf文件呢?
    解决方案:本程序使用的MDK5的V6编译器,利用了armlink中的BPABI中basic_platform特性,实现了这种特殊的elf文件生成。

  • 问题3:主体程序是通过什么方式调用APP程序呢?
    解决方案:主程序调用APP的程序有两种方法,第一种是直接通过APP的程序入口点进行调用,用于简单调用的情况,每个APP程序的程序入口点为APP程序中的dl_main函数,可以直接通过主体函数dl_get_entry获得APP程序入口点dl_main的函数指针,进而进行调用。第二种是通过函数名进行调用,使用dl_get_func,以函数名的方式在动态链接表中寻找对应的函数指针,进而进行调用。注意:当且仅当APP中定义的函数被DLL_EXPORT修饰时,此函数名才会出现在动态链接表中,才能被主题程序调用。

  • 问题4:APP程序如何调用主体程序的部分函数?
    解决方案:在主体程序与APP程序间,约定一个固定地址的程序向量表,主体程序把相关函数指针填入到向量表中,APP程序通过查表获取主体程序的函数指针,进而进行调用。

程序源码相关文件介绍

主体程序包含头文件dl_lib.h,.c文件全部加入到工程中即可使用。APP程序编写可以参照附件中的模板工程(源码有点多,有需要在介绍)

ELF手册-中文版.pdf

其他说明

动态加载运行的程序性能与正常的有差别

在F1和F4上可能会有一点儿差别,动态加载会稍慢点,我这里只有H7的板子,没做测试。

在H7里,由于有Icahe,两个速度基本一样,没啥影响

APP动态加载测试程序

Host静态加载测试程序

实际测试效果,静态运行的函数与动态加载的函数运行时间基本一致

之前做国网产品的时候,国网提供的操作系统就是动态加载app,知道是rtt的lwp模块,但是一直没有弄清楚。请问动态加载bin文件可以吗?之前国网提供的操作系统就是通过ymodem下载bin,然后再动态启动

首先,我理解的Bin文件是纯粹的供单片机使用的二进制代码文件,不能直接直接动态加载bin文件,这直接是原理性的限制。RT-Thread也不能直接直接加载通常意义上的Bin文件。在动态加载时,程序代码的存储的位置是需要在运行时确定的,因此在动态加载时,需要更改机器码中所有与地址有关代码,这个操作需要链接器辅助支持(开启链接器的相关选项、编写相应的sct文件,示例的APP工程中有),链接器把与地址有关的代码位置与修改方式,以重定位表的形式附加在elf文件中,单纯的Bin文件中没有这个信息,因此也就不太可能实现。除非这个动态加载是存储在RAM的固定位置的,可那样的话也就不是真正意义上的动态加载了。

知道原理后,想法就可以特别多了啊,博主实现的是用MUC处理ELF文件得到可执行程序,你也可以使用上位机实现,甚至服务器实现也可以,最终都是得到可以运行的机器码,之前没有动态加载的功能是无法解决重定向的问题,博主这边文章实现重定向功能,只需要理解修改就可以了。

无论是MCU还是上位机或者服务器实现处理ELF文件得到可执行APP程序,都需要考虑APP程序固化问题吧,一旦MCU断电再上电还需要重新动态加载APP程序吧

ThreadX 的Module,是否可以参考下?

其实像这个动态加载的实现,参考ThreadX的moudle意义不大。当时实现陷入死胡同的时候,确实想着参考一下ThreadX的moudle,结果因为之前没用过ThreadX,没找到相关的实现在哪里。。。其实这种动态加载的实现都差不多,都是通过加载具有重定位信息的elf文件实现的,而且有很多的实现,都是需要依赖相应的工具链,比如RT-Thread的实现。我写的这个是根据elf文件结构实现的,好处就是比较通用,基本上只要是带有动态段的elf都支持,不过除了MDK5,其他工具链的就要自己研究研究怎么生成带有动态段的elf了

如果是单独加载函数,且函数只用到了入口参数和局部变量应该相当于跳转,比较容易;如果加载的代码需要用到其他函数或全局变量可能需要动态加载内容比较多

理解正确。其实重定位部分开销不算很大,而且只需要加载一次,后面在使用就和flash运行程序一致了

H7-TOOL的lua 语言就是这个特点。但是Lua 库需要的空间资源还是很大的。我的理解是用App 生成 elf文件,再通过一个上位机将 elf文件发送给 HOST,HOST解析这些函数。 是这样的吗?

差不多是这个意思。主机通过elf文件,把文件里程序的机器码回复出来,然后执行。与lua相比,空间资源要小很多很多,运行速度也是lua无法比拟的,另外不需要学习额外的编程语言,缺点就是比较依赖于工具链和芯片架构。

elf文件太大,能做成类似bin不

这个暂时没办法做成bin实现,因为bin文件里缺少用于重定位的辅助信息,不过如果将这个辅助信息保留,在添加到bin文件中,这样的话文件体积就会小很多很多。这个需要开发一个小工具实现这种操作,我没太接触过上位机开发,假期可以考虑实现一个这样的小工具

我后面又看了下链接器的命令行选项,通过命令行–nodebug –no-commment 可以把elf文件压缩的很小,基本上只保留了必要的信息。不知道是否满足你的要求

我们这之前用Keil的Overlay实现过不同Code占用相同RAM,楼主这个更彻底,即是ROPI也是RWPI,并且自己写了ELF Loader。学习一下,以后看要不要用在项目上。

threadx的module生成的bin文件体积小,文件的最前位置带了信息。像rtt的动态加载就是elf体积比较大,好处就是可以定好函数符号表方便调用

通过命令行配置可以让elf文件变小很多,在gitee提交的工程中修复了这个问题

在dynamic_loader那个仓库提交的

SVC_CM7_Keil.lib 请问 这个库是负责什么功能的,WZH大侠
SVC_CM7_IAR.a / SVC_CM7_GCC.a / SVC_CM7_Keil.lib: 16 bits mono/stereo and
multichannel input/output buffers, library runs on any STM32 microcontroller featuring a
core with Cortex&#174;-M7 instruction set.

这个库是ST公司的一个智能音量控制的库,可以智能调节音频信号的增益,-80dB到36dB的范围

动态加载的工程是独立编译么?

被用来加载的elf文件与下载到单片机的工程是分开编译的,论坛里的app_elf_generate的工程用来生成被加载的elf文件,host_elf_loader则是用于解码加载elf文件的程序代码

有必要测试一下函数查找, 加载和释放的耗时.

这个不太好测,因为这个耗时是根据动态加载的elf不同而不同,主要的耗时操作如下。
dl_load_lib:读文件、分配内存空间、将elf文件的加载域复制到内存、地址重定位、分配函数字符串的空间。
其中地址重定位、分配函数字符串的空间与elf文件中的动态符号表数量有关,代码中和全局变量相关的代码越多,需要重定位的地方越多,导出的函数越多,句柄中的函数串越多。
dl_get_func:这个函数就是查表,根据字符串寻找到elf文件中的函数指针
dl_get_entry:这个函数返回句柄中的entry_addr,没有额外操作
dl_destroy_lib:释放掉加载elf文件的内存,释放掉字符串函数表的内存,与导出的函数数量正相关
在一般的使用中,这几个函数可以很快的执行完

楼主,请问一下:dl_load_shared_object函数中加载elf文件时,分配的是栈上的空间,那么函数退出后,这段空间不就没有了嘛,怎么还能后续再次执行动态库中的代码逻辑呢?

这是分配在堆上呀,函数退出依旧会保持的内存区

抱歉,从linux过来的,看到alloc函数就下意识的认为是在栈上开辟的空间。我追到底层看了下,虽然不太理解,但是看到malloc ralloc 和alloc都是差不多的汇编实现,感谢楼主的回复。

楼主你应该有发现用你这种方法(按你的工程进行编译)是有bug的.比如重定位时多个字符串的地址是同一个地址

  • 源码和反汇编以及readelf

A:

这没问题,第一个Relocation为代码中引用全局变量的地址,这个肯定是不同的。
第二个是符号值,这个符号值其实是代表的这个全局变量在整个elf文件中的偏移地址,代码中多次引用同一个全局变量就会出现这种情况。

Q:

str = “test string\r\n”; 这句代码通过重定位后,str获取的地址是”hello world\r\n”的地址, 你认真看下,里面有三对movw movt需要重定位, offset 0006 000e 这一对是获取str的地址,其他两对是本来分别是要获取”hello world\r\n” 和 “test string\r\n” 的地址, 但是后面两对都是获取”hello world\r\n”字符串的地址.

A:

这汇编确实有点问题,你用的编译器版本是什么呀,我一样的代码,和你的反汇编完全不一样。
file:///C:/Users/wzh/Desktop/%E5%B1%8F%E5%B9%95%E6%88%AA%E5%9B%BE%202022-04-21%20093251.png
file:///C:/Users/wzh/Desktop/%E5%B1%8F%E5%B9%95%E6%88%AA%E5%9B%BE%202022-04-21%20093439.png
file:///C:/Users/wzh/Desktop/%E5%B1%8F%E5%B9%95%E6%88%AA%E5%9B%BE%202022-04-21%20093453.png

建议检查一下,重新编译生成一下试试

场景使用:

  1. 我们目前在MCU上跑dlmodule,可能更多是抱着学习,了解原理的心态,一般来说,动态模块会使用在RAM大于4MB的平台中。
  2. 动态模块可以对未来不可预知的一些功能的扩展
  3. 可以做到类似于安卓app,把一些特殊功能的应用交给第三方的模块独立完成
  4. 调试使用,比如调试某个具体功能时,如果每次都修改整个项目工程的源码,然后编译,下载,如果整体烧写flash效率比较低,此时就可以使用动态模块调试

一定要用keil编译吗? gcc不行?

程序分为两部分,一部分是用于加载程序的动态加载器,这部分可以用任何平台编译。
另一部分是被动态加载的程序,这部分使用Keil编译的,因为本文中的生成用于动态加载的程序利用了Keil的链接器的部分特性。如果gcc有这部分特性的话,当然可以用gcc编译,只不过需要自己研究一下相关的编译器与链接器手册。

其他:可以用GCC-ARM-NONE-EABI 编译器试一下,需要自己写.ld文件,.ld文件也可以借助STM32CUBE IDE 配置生成,然后再根据楼主.sct文件改改就好了

版主你好,你发的教程里动态加载的实现,使用RAM空间较小的MCU能实现吗,比如stm32l431 64kRAM。是不是app代码不能写的太大,因为程序是加载到RAM中运行的?

没错,是在ram中运行的。单个app的代码写的太大确实会装载不下,像这种情况可以把一个大的app拆成多个小的来加载。

使用GCC编译 dl_vector.c 会有stdin、stdout、strerr initializer element is not constant 的error,这个问题有人遇到过吗

A: 这几个变量和编译器有关,我这个只适用于arm clang编译器

楼主,您好。看你的文章大受启发,已经移植成功RTT的rt_err_t dlmodule_load_relocated_object(struct rt_dlmodule* module, void *module_ptr)
我请教一个问题,像这种Relocation type for arm的符号如何找到对应的汇编指令以及解析方式,我看您实现了R_ARM_THM_MOVW_ABS_NC 以及R_ARM_THM_MOVT_ABS,有相关资料去了解吗
谢谢~期待你的回复

这个我当时是在arm官网关于动态加载的文章中找到的,那篇文章链接现在失效了,可以在官网里再找找看。原文链接如下:https://developer.arm.com/documentation/ihi0044/h/?lang=en#dynamic-linking

我已经在mdk环境和gcc环境测试都OK了,不过在你的工程上我只保留了uart、led、sd 这三个外设,你提供的资料帮助很大,非常感谢

函数表这些我都剪掉了,测试的时候自定义简单的就好了,后面有需要在慢慢添加

楼主,现在我工程里面可以动态调用函数了,不过我是裸机环境,子程序中调用的printf、clock等函数,现有的实现方式不行,按您的做法现在是会卡死,裸机环境下的实现您有研究过吗?由于不能使用SVC指令,我的理解应该要自定义管理中断服务程序、中断向量表等

我想的一种简单点的方式是主程序挂载回调函数的方式,提供给子程序调用,实现体还是在主程序中,我还未验证是否可行,即使可行,子程序代码可移植性没那么好

有什么建议提供给我参考吗,感谢

A:

我帖子里的工程好像有点问题,最好还是用gitee上的工程,另外我能想到的比较简单的方法就是约定一个固定的地址,把app要调用的函数指针以数组的形式存在这个地址里,app通过固定地址加偏移量,获取函数指针进行访问。

能否使用全局的参数?比如主程序的一些结构体成员

可以,可以将全局变量用指针传递进去

请问,这个动态加载,可以支持RTOS吗? 例如使用freeRTOS?

支持,我用的RTX5

Q:非常感谢!我要深入的研究一下!现在不适用OS,简直已经不能用了。看来这个也可以移动到ThreadX下了。Thread-X下的MODULE主要是不能作为库使用。 我主要是需要动态加载很多的库!

Q:

这里还是有个迷惑的地方:
操作系统每个任务都是有自己的栈空间的,用来进行局部变量。
动态加载的函数,使用哪里的栈呢? 因为OS任务切换的时候,都是维护自己的任务栈。 这里有点迷糊!

A:

arm单片机入栈出栈都是使用专用的PUSH,POP指令的,具体PUSH,POP的栈空间地址,是由MSP与PSP指针决定的。换言之,哪块调用了动态加载的代码,就使用哪里的栈空间。

谢谢分享,你的elf loader跟这个文章是类似的吗

https://ourembeddeds.github.io/blog/2020/08/16/elf-loader/

对,我的实现方法和这篇文章大体思路是一样的,但在具体操作上略有不同。我没做符号表的支持,也就是在编译时不链接一些函数,而是在动态加载时在链接。因为MDK5的编译器在编译base_platform属性的elf文件时,在编译期时就需要确定所有函数的定义,要不然无法链接。同时不使用这种符号表导入的方式可以大幅减少加载的的过程。

ELF Load: Dynamic load and execute for your mcu.

But wait! This is not totally the old-fashionist experience… My binaries must be embedded in the firmware in order to work! You also shouldn’t expect to be able to listen to your old 5’’ 1/4 drive (or better, your dataset) but the fresh experience of binary loaded is lost for ever and never… or not?

Loading binaries, the simplest way

In an old PC, when you type a command, the operating system searchs a file with the command name and extension COM (or EXE in newer versions) and tries to load it… At this moment, several things happen:

  1. The system calculates memory usage of the executable and reserves this amount of memory in the system
  2. The OS reads the file and copies the pertinent areas in the reserved memory.
  3. Depending on architecture, some adjustments to loaded data may be needed. In the case of 8086 and *.com files, the architecture of the memory management unit enables load without any adjustments in this phase.
  4. An execution environment is created (reserving memory if required) and configures some registers of the processor to point to this environment before the next phase
  5. Finally, the OS jumps to the entry point of binary and delegates the execution to the recently loaded code

As mentioned in the point 3, normally in a PC processor the architecture enables execution with minimun or unexisting binary modifications (segmentation in 8086 and MMU in modern x86 systems).

You can see next, the 8086 memory layout at COM executable load:

In this example, the binary is limited to 64K of memory and the processor reserves one of the segments for the program usage (in the execution, the program can load more code or request more memory to OS, but the binary is limited to one 64K segment). In modern systems with a memory management unit (MMU), you can map any virtual direction to any real direction (well, not exactly… in 4K blocks of granularity, but you do understand, right?) and can select the memory layout of your executable freely.

VM-executable-load

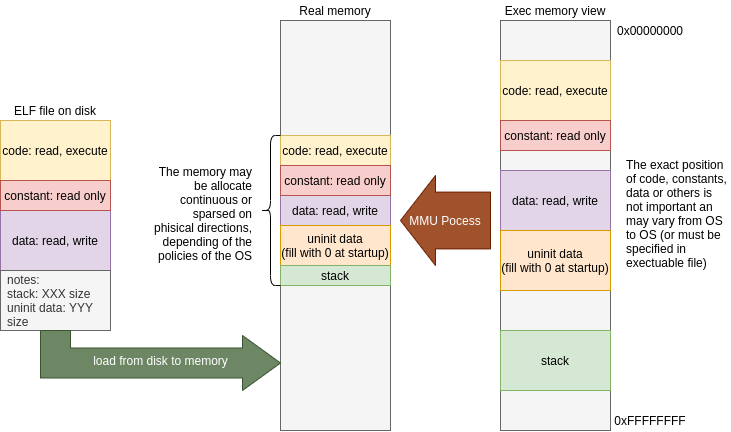
Usually, the process to load executable in MMU systems is more complex, involves copy of a portion of the file dynamically at request using a virtual memory trick called page-fault. In short, you only need to configure the memory of your process with required pages and mark as no-present this pages; at the moment is necessary to access these pages, the hardware triggers an interrupt thath is caught by the OS who proceeds to load these pages for you.. cool don’t you think?.

But when you try to replicate this behavior in your embedded system… the magic is gone and you will quickly see the problem: You need to use fixed address for your binary load:

mcu-executable-load

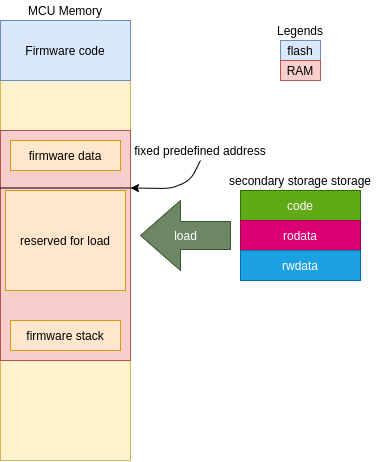
This schema works more or less properly for a single executable, but if you need nested executable load or multithread load, this approach is quickly wasted.

In many architectures (highlighting ARM, MIPS and RISC-V) the jumps normally refer to the current program counter (PC) to jump. In this architectures, the code is easy loadable in any position of memory (respecting some rules of aligns) but the data is more complex because it needs one or two indirections to refer a proper memory area independently of the load position.

Fixing the world one word at time

If your processor lacks MMU, to load programs at arbitrary addresses, you can look for several approaches:

  • Make the code suitable to detect the current address and adjust their references in accordance to it: This is called “position independent code” or PIC (similar approach with very subtle differences is called “position independent executable” or PIE) and implies one or two levels of indirection in any code. But don’t celebrate yet, the PIC code has various challenges to solve:
    • Jump of code independent of position: This normally is made using special processor features like PC relative jumps. This is easy when the compiler knows the relative position of code in compile time, but becomes difficult when the address of the code is dinamically calculated, like in jump tables.
    • Access data in arbitrary loadable position: Normally, the PIC code uses indirect access through a relocation table called global offset table (GOT) modified by the loader before code startup.
    • Mix of previous points: Normally, when your code jumps to a calculated position, you need a GOT entry reserved for this calculus and need to adjust this entry like other data access. Due to optimization, the compiler may prefer other approach, using an stub of code adjustable at startup for perform this dynamic jump. This technique is called procedure linkage table and consists in a little stub of code that performs a call to undefined pointer (normally an error function) and the loader adjusts this code in load time to point to the correct code block. This approach enables you to share code in libraries, although it requires a little more of work.
  • Leave any memory reference as undefined and mark in a table the needed to modify this portion of code in order for the program to work.

The first approach needs less work in the loader area but the performance at runtime is worse than the fixed memory address code. In contrast, the second approach needs more loader work but the performance of the code is nearly the same as the fixed address code…

In the end, the PIC code is the only suitable way to share code across multiple libraries for single binaries. For example, with the PIC code you can have a one library for string formatting (aka printf) and share the code with many programs. Additionally, the PIC code can reside in flash without any modifications, only a PLT and GOT is required in RAM, and change from program to program (this require OS help on context switch).

Global offset table schema
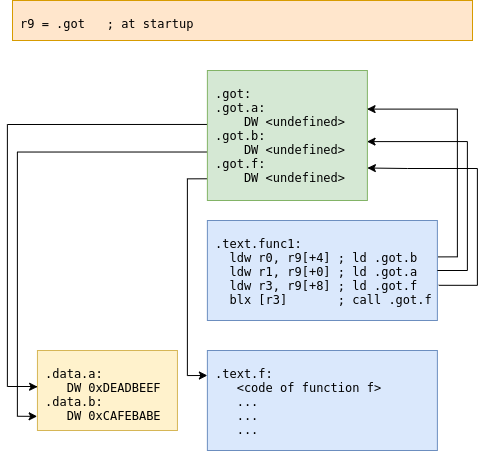
got-operation

Relocation schema
1
2
3
4
5
6
7
8
9
10
11
// extern int f1(int, int, char);
// void func1() {
// f1(0, 0xAA55AA55, 32);
movs r2, #32
movs r0, #0
ldr r1, [pc, #4] // <func1+0xc>
ldr r3, [pc, #8] // <func1+0x10>
bx r3
nop // Align instruction
.word 0xaa55aa55
.word 0x00000000 // <f1> replace with addr of symbol

Put ya guns on!

Our preferred approach in embedded systems is to load the code and relocate individual references instead of GOT usage due to the performance degradation of adding two indirections (one for GOT pointer and one for GOT entry) in every memory access.

In MMU systems, the ELF load process is really straightforward:

  • Map the file from disk to memory (with help from MMU and OS swap service) and resolve memory map to satisfy the ELF layout.
  • Scan a relocation table and resolve undefined symbols (normally from dynamic libraries in the system).
  • Make a process environment and adjust the process register to point to it (normally an in-memory structure representing the process state).
  • Let the OS load the new processor state with the correct environment. Normally, this is limited to putting the process state in a ready queue in the OS structures and letting the scheduler do the switch process when available.

Without MMU, the process require some precautions:

  1. You cannot load the entire ELF from secondary storage because this action consumes more memory than expected (the ELF may contains debugging sections, some unneeded information like symbol tables and other non required data at runtime).
  2. The memory is non-virtualized, all process share the same memory space and can potentially access (in a harmful way) the memory from other process… You need to take precautions, some MCU have a protection memory system (like MPU on ARM or PMP on RISC-V) to mitigate this issue.
  3. You need to reserve only loadable sections like .text, .data, .rodata, .bss, and .stack, other sections are only used at the load time like relocation symbols and elf header.
  4. You need to travel trough all symbols and relocate every entry in the binary… this may take some time but the execution time has little impact compared with the PIC code.

You can see our implementation of the load-relocate schema in this link.

Due to the simple nature of the loader, it cannot handle all type of relocations and sections. Ideally, you can extend the code to cover your necessities, but the actual implementation works fine with some precautions at the moment of guest binary compilation:

  • You cannot use “COMMON” sections, all of non initialized data must be in BSS. The gcc flag to force this is -fno-common.
  • You need to link the final ELF as a relocatable executable. This prevents the linker from resolving undefined symbols, instead it embeds the information needed to resolve the symbols in the binary. The gcc or ld flag to force this linking behavior is -r.
  • You need to force the compiler to produce only “word relocation” types. This is the simplest relocation form and is easier to handle in load time. In ARM architecture, this forces all relocations to be of type R_ARM_ABS32. To enable this, gcc for ARM provides the flag: -mlong-call. In old compilers this is not strictly true and the flag will not produce correct results, many relocations will be of type R_ARM_THB_CALL or R_ARM_THB_JMP. Don’t panic, the actual loader can handle this type of relocations, but the load phase will be sensibly slower due to major processing work.
  • By default, all compilers provide a startup library that is executed before main, and initializes some data and code for you, but this is undesirable in this situation. You need to disable the inclusion of these codes and provide a self written version to _start or other function of your election. This behavior can be enabled in gcc using the -nostartfiles flag.

Additionally, you can provide a linker script with your preferred memory layout, but the suggested minimum linker script layout looks like this:

1
2
3
4
5
6
7
8
9
10
11
12
13
14
15
16
17
18
19
ENTRY(_start)
SECTIONS
{
.text 0x00000000 :
{
*(.text* .text.*)
}
.rodata :
{
*(.rodata* .rodata.*)
}
.data :
{
*(.data* .data.*)
}
.bss :
{
*(.bss .bss.* .sbss .sbss.* COMMON)
}

This places all sections in contiguous memory. If your architecture requires some align, you need to add “. = ALIGN(n);” statements between sections.

At this point, the loader API is really simple:

Initialize it.

You need to define an environment variable for the new binary with:

1
2
3
4
5
6
7
8
9
typedef struct {
const ELFSymbol_t *exported;
size_t exported_size;
} ELFEnv_t;
...
const ELFEnv_t elfEnv = {
symbolTable,
sizeof(symbolTable) / sizeof(ELFSymbol_t)
};

This contain a reference to an array of resolvable symbols and the number of the elements inside the array. The entries of this array contain the name and the pointer to be resolved:

1
2
3
4
5
6
7
8
9
10
11
typedef struct {
const char *name; /*!< Name of symbol */
void *ptr; /*!< Pointer of symbol in memory */
} ELFSymbol_t;
...
const ELFSymbol_t symbolTable[] = {
{ "printf", (void*) printf },
{ "scanf", (void*) scanf },
{ "strstr", (void*) strstr },
{ "fctrl", (void*) fctrl },
};

Additionally, you need to create an object of type loader_env_t and set the symbol table inside this struct.

1
2
3
ELFExec_t *exec;
loader_env_t loader_env;
loader_env.env = env;

In the next phase, you need to call load_elf with the PATH of the binary, the environment and a reference to the pointer of ELFExec_t:

1
load_elf("/flash/bin/test1.elf", loader_env, &exec);

If the operation ends successfully, the return status is 0. In case of an error, it will return negative number indicating the specific error.

In this point, you have the binary loaded and allocated in the memory, and you can jump into start entry point or request the address of specific symbols:

In the first case, you need to call the function like this:

1
2
int ret = jumpTo(exec);
if (ret...

If the program ends successfully, the function returns 0, otherwise it will return a negative number depending to the error.

If you need to request an specific function pointer you can use

1
void *symbolPtr = get_func("myFunction", exec);

This returns a pointer to the function start or NULL if the object is not found.

If you need an arbitrary pointer to other symbol (variable, constant or whatever) you can use:

1
void *symbolPtr = get_obj("myVar", exec);

After all, you can free all allocated memory for the binary and the metadata of the ELF file with:

1
unload_elf(exec);

System interface

In order to be flexible in the implementation, the library leaves undefined some API of low level access for port to any system.

The low level layer need the following macros defined:

  • LOADER_USER_DATA: Structure or datatype to contain the platform dependent data for file access. For example, this needs at least, a file object (integer file descriptor, FILE* struct, or whatever) and an environment pointer to ELFEnv_t.
  • LOADER_OPEN_FOR_RD(userdata, path): open file in path and modify userdata in order to save the file descriptor, or file pointer.
  • LOADER_FD_VALID(userdata): Check if the opened file data is a valid file and can be read from.
  • LOADER_READ(userdata, buffer, size): Read size bytes from file descriptor in userdata and put it in buffer array.
  • LOADER_WRITE(userdata, buffer, size): Write size bytes to file descriptor in userdata from buffer pointer. This macro is not used internally, it is only defined in symmetry with the macro above.
  • LOADER_CLOSE(userdata): Close the file descriptor in userdata.
  • LOADER_SEEK_FROM_START(userdata, off): Move read pointer off bytes from the start of file pointed by descriptor in userdata.
  • LOADER_TELL(userdata): Return current position of file descriptor in userdata.
  • LOADER_ALIGN_ALLOC(size, align, perm): Return size bytes aligned as align bytes with perm permission access. If you do not provides differentiate access of memory region, the returned region can be write, read and execute. By default, the macro call a function void *do_alloc(size_t size, size_t align, ELFSecPerm_t perm);.
  • LOADER_FREE(ptr): Deallocate memory from pointer ptr
  • LOADER_STREQ(s1, s2): Compare two strings s1, and s2. The result of equal strings must be != 0 and when the strings differ, the result of this macro must be 0. The simplest implementation is: (strcmp((s1), (s2)) == 0)
  • LOADER_JUMP_TO(entry): Perform a jump to application entry point. entry is the address of the first instruction of the code. You can simply cast the value to a function pointer with selected fingerprint or do a more complex operation like environment creation, start a new RTOS thread or whatever is required for your architecture.
  • DBG(...): Print (in printf like format) debug messages. Can be empty if you do not need debug messages.
  • ERR(...): Print (in printf like format) error messages. Can be empty if you do not need error messages.
  • MSG(msg): Print (in printf like format) information messages. Can be empty if you do not need information messages.
  • #define LOADER_GETUNDEFSYMADDR(userdata, name): Resolve symbol name name and return its address. The most simple way to do this is to perform a search in specific structure under userdata with a symbol table. If the process fail, the data returned must be 0xffffffff AKA ((uint32_t) -1)

The golden implementation uses ARM semihosting IO for file access, but you can port this to any API like fatfs or similar.

contiki里面也实现了动态加载

https://github.com/contiki-os/contiki/blob/master/core/loader/elfloader.c

https://github.com/contiki-os/contiki/wiki/The-dynamic-loader


相关链接(侵删)

  1. STM32H7 论坛首发,STM32实现动态加载模组(似于Windows的dll),使用MDK编译动态库类

=================我是分割线=================

欢迎到公众号来唠嗑: