插件主要功能
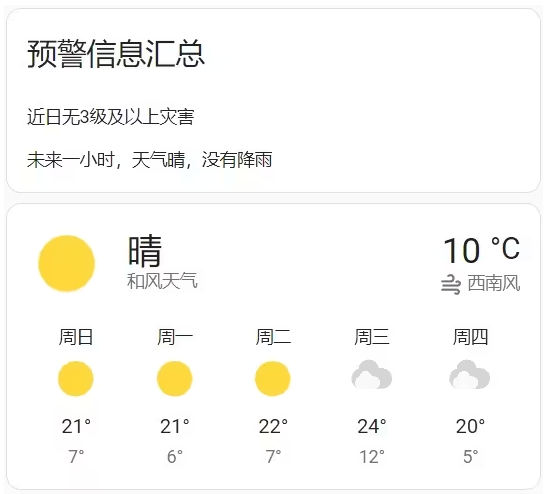
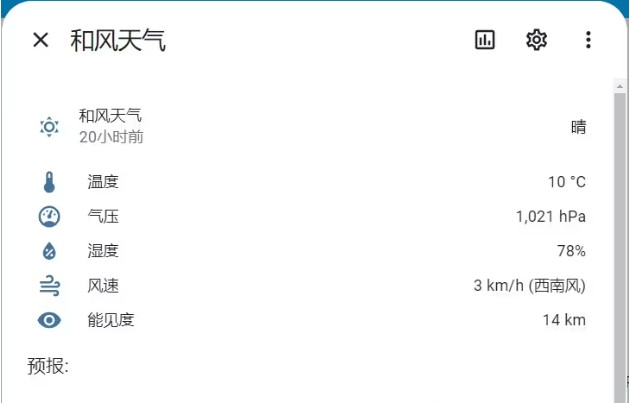
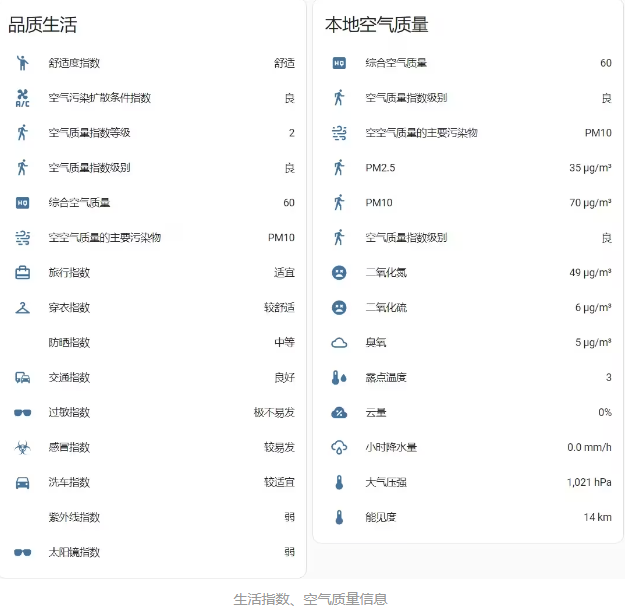
当前天气、空气质量、生活指数建议
灾害天气预警
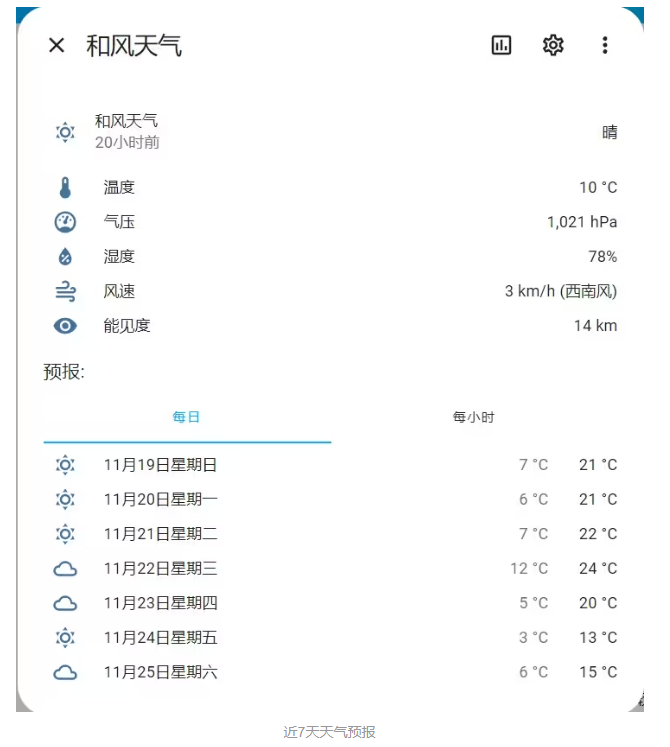
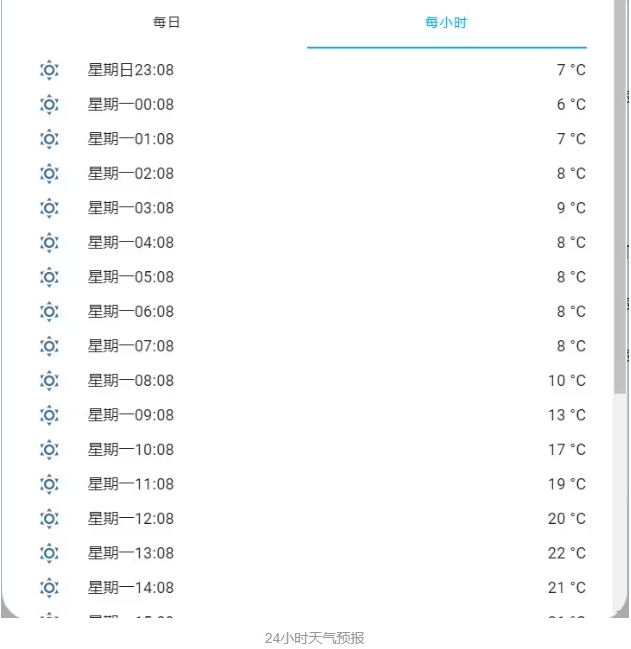
小时级天气预报、七日天气预报
效果展示
前言
我使用的插件最早引用自瀚思彼岸论坛Golden_Soap大佬的插件(https://bbs.hassbian.com/thread-3971-1-1.html),
但该插件一直没有更新过配置,导致我的环境一直无法运行,自己肝的原因主要是懒得改之前的参数配置,换插件全得改一遍,有的数据还没了,又正好借着这个机会再学习一边插件,所以就有了这个插件,废话不说上地址
仓库地址
https://github.com/c1pher-cn/heweather
插件说明
使用和风官方apiv7版本
需要使用开发者账号里的免费api,普通用户请务必升级到开发者账号(免费,但要提交身份证审核,api权限会比普通用户高一些)https://console.qweather.com/#/console
appkey申请需要先创建应用,后选添加数据key,选wabapi即可
配置里的Location_ID 如何获取?详见https://github.com/qwd/LocationList/blob/master/China-City-List-latest.csv
配置方法
- 下载相关文件
先按github上的文件目录格式把对应文件拷贝到HomeAssistant的custom_components目录,
想用hacs商店的同学需要晚一点(HACS商店的配置预计会在12月底左右上线,9月就提交了,审批进度贼慢,在hacs商店里搜索haweather后安装后进行yaml配置编写)
正确下载文件后的文件目录格式:
1
2
3
4
5
6
7
8
9
| custom_components/
--heweather
--manifest.json
--sensor.py
--weather.py
|
注意,无论使用哪种安装方式,本插件都必须进行下面的yaml配置后才能看到具体信息!!!
- weather下的heweather(七日天气预报)
1
2
3
4
| weather:
- platform: heweather
location: 101210106
key: ABCDE
|
- sensor下的heweather(天气情况、空气质量、自然灾害预警)
1
2
3
4
5
6
| sensor:
- platform: heweather
location: 101210106
key: ABCDE
disasterlevel: 3
disastermsg: allmsg
|
1
2
3
4
5
6
| 1 Standard
2 Minor
3 Moderate
4 Major
5 Severe
6 Extreme
|
title 只显示标题
allmsg 显示标题+明细信息
- 相关传感器名称:
已有中文翻译配出来就能看到,文档里我就不对应写了,另外如果配置多个heweather或者修改过key和location信息的话,找不到新实体时可以注意一下,新实体id后面会新增一个_2 _3
1
2
3
4
5
6
7
8
9
10
11
12
13
14
15
16
17
18
19
20
21
22
23
24
25
26
27
28
29
30
31
32
33
34
35
36
37
38
39
40
41
42
43
44
45
46
47
48
49
50
51
52
53
54
55
56
57
| 天气预报,7天,24小时级别都在这里面
weather.he_feng_tian_qi
生活指数
sensor.shu_gua_du_zhi_shu
sensor.kong_qi_wu_ran_kuo_san_tiao_jian_zhi_shu
sensor.lu_xing_zhi_shu
sensor.chuan_yi_zhi_shu
sensor.fang_shai_zhi_shu
sensor.jiao_tong_zhi_shu
sensor.guo_min_zhi_shu
sensor.gan_mou_zhi_shu
sensor.xi_che_zhi_shu
sensor.zi_wai_xian_zhi_shu
sensor.tai_yang_jing_zhi_shu
空气信息
sensor.heweather_level
sensor.heweather_category
sensor.heweather_qlty
sensor.heweather_primary
sensor.heweather_pm25
sensor.heweather_pm10
sensor.heweather_no2
sensor.heweather_so2
sensor.heweather_o3
sensor.heweather_dew
sensor.heweather_cloud
sensor.heweather_precip
sensor.heweather_pressure
sensor.heweather_vis
|
- 关于两个预警信息
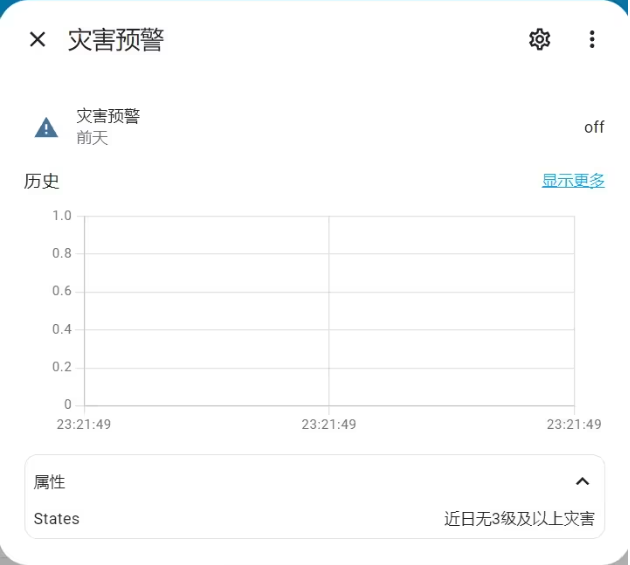
灾害预警有具体有配置实体:sensor.heweather_disaster_warn,为了方便做相关自动化,传感器状态为on时,表示有相关灾害,灾害信息存在States里
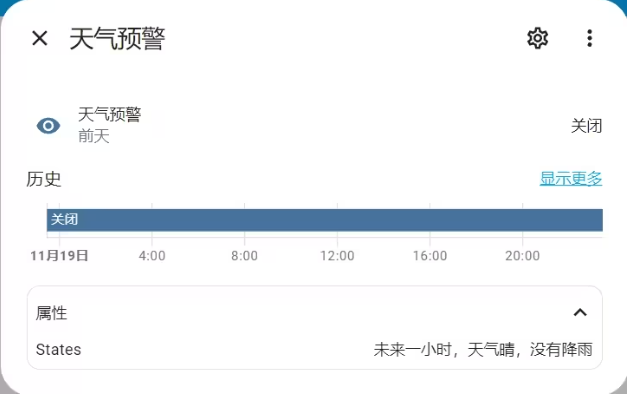
近一小时天气预警:
需要自己在template里配置一个sensor模板,可以参考我的配置(读取小时级天气预报,然后判断是否有雨雪天气,有的话sensor的状态会被置为on,同时sensor的states的值即为具体的天气信息和降水概率)
1
2
3
4
5
6
7
8
9
10
11
12
13
14
15
16
17
18
19
20
21
22
23
24
25
26
27
28
| template:
- trigger:
- platform: time_pattern
hours: "*"
action:
- service: weather.get_forecast
target:
entity_id: weather.he_feng_tian_qi
data:
type: hourly
response_variable: forecast
sensor:
- name: heweather_rain_warn
unique_id: heweather_rain_warn
state: >
{% if forecast.forecast[0].condition in ('sunny','cloudy','partlyclou dy','windy') %}
off
{% else %}
on
{% endif %}
attributes:
states: >
{% if forecast.forecast[0].condition in ('sunny','cloudy','pa rtlycloudy','windy') %}
未来一小时,天气{{forecast.forecast[0].text}},没有降雨
{% else %}
接下来一小时会有{{forecast.forecast[0].text}},降水概率为 {{ forecast.forecast[0].precipitation_probability}}%
{% endif %}
|
自动化能做的
每日起床第一次出卧室的天气tts播报,或类似的日常播报需求
根据自然灾害预警的信息发信息通知
根据小时天气预警的内容进行信息通告
》》》和风天气自动化分享
就是下文内容
HomeAssistant 和风天气插件的自动化分享
前置要求
HomeAssistant (这个都没有的话您可以关网页了)
和风天气插件
github地址:https://github.com/c1pher-cn/heweather
之前的专栏介绍:https://www.bilibili.com/read/cv17792717
(优先看github,有些bug修了可能来不及更新文章,另外其他插件也是大同小异,可供参考)
tts
我这里用的我家的homepodmini,edge_tts 每家的设备不一样,选择适合你的
消息推送
是我这里使用的是iosApp内置的推送功能,推送给我和我老婆两个人的手机
我做了哪些天气自动化:
- 雨雪天气报,tts播报,手机推送
- 自然灾害预警,tts播报,手机推送
- 每天起床后的第一次tts天气播报
天气、灾害预警
预警中主要使用和风天气插件的这个两个实体
sensor.heweather_rain_warn (模板配置)
sensor.heweather_disaster_warn(插件自带)
在2023年11月更新heweather之后,天气预警需要手工在template里配置,配置方式详见https://www.bilibili.com/read/cv17792717
新的传感器在写代码的时候就考虑了自动化的实现,所以我们只判断传感器状态是否为on即可,on即说明对应传感器有异常天气,然后在tts或者通知里将属性中的status打出来即可,已经提前设置好。
1
2
3
4
5
6
7
8
9
10
11
12
13
14
15
16
17
18
|
alias: 一小时天气预警
trigger:
  - platform: state
    entity_id:
      - sensor.heweather_rain_warn
    from: "off"
    to: "on"
action:
  - service: notify.mobile_app_iphone_xr_2
    data:
      title: 天气预警
      message: "注意注意! {{state_attr('sensor.heweather_rain_warn', 'states')}} "
  - service: tts.edge_tts_say
    data_template:
      entity_id: media_player.ke_ting
      message: "注意注意! {{state_attr('sensor.heweather_rain_warn', 'states')}} "
initial_state: true
|
1
2
3
4
5
6
7
8
9
10
11
12
13
| alias: 自然灾害预警
trigger:
- platform: state
entity_id:
- sensor.heweather_disaster_warn
from: "off"
to: "on"
action:
- service: tts.edge_tts_say
data_template:
entity_id: media_player.ke_ting
message: "注意注意!!! {{state_attr('sensor.heweather_disaster_warn','states') }} "
initial_state: true
|
起床天气播报
天气播报这里我做了一个脚本来实现的,因为播报这个动作是很多情况都可能需要的,比如起床需要播报,想出家门或者家里其他人也想触发的情况,避免重复,我写了一个播报脚本,然后需要触发播报的时候只要触发脚本即可。
- 起床触发->天气播报
- 按钮触发->天气播报
天气播报脚本
1
2
3
4
5
6
7
8
9
10
11
12
13
14
15
16
17
18
19
20
21
22
23
24
25
26
27
28
29
30
31
32
33
| alias: 客厅广播
sequence:
- service: tts.edge_tts_say
data_template:
entity_id: media_player.ke_ting
message: >
{% set timenow = now().time().strftime("%H") | int %}
{% if timenow > 8 and timenow < 12 %}
主人,早上好
{% elif timenow >= 12 and timenow < 14 %}
主人,中午好
{% elif timenow >= 14 and timenow < 18 %}
主人,下午好
{% elif timenow >= 18 and timenow < 23 %}
主人,晚上好
{% else %}
你好。
{% endif %}
现在天气{{states('sensor.heweather_text')}},
空气质量等级为{{states('sensor.heweather_category')}}
主要污染物为{{states('sensor.heweather_primary')}},
室外湿度{{states('sensor.heweather_humidity')}}%,
室外温度{{states('sensor.heweather_temperature')}}℃,
室外体感温度{{states('sensor.heweather_feelslike')}}℃,
室内湿度是{{states('sensor.4c65a8dbf864_humidity')}}%,
室内温度是{{states('sensor.qdhkl_ac_0106_temperature')}}℃,
{% if states('sensor.heweather_precip') | float > 0 %}
所在地区的降雨量为{{states('sensor.heweather_precip')}}毫米
{% else %}
{% endif %}
{{state_attr('sensor.heweather_rain_warn', 'states')}}
mode: single
|
如何定义起床?这里我是在客厅装了个人体传感器,把每天早晨第一次有人经过时定义为起床,在这个时候播报,后面再有人经过不再进行播报。所以我这里需要一个计数器,每天定时清零,然后早晨有人经过从0到1时触发起床自动化,启动播报脚本。
计数器:
1
2
3
4
5
6
7
8
9
10
11
12
13
14
15
| counter:
livingroom_counter:
name: humancnt
icon: mdi:account-plus
计数器清零的自动化,这里不要问我为什么配置3点清零,因为我们家都是夜行动物
- alias: 计数器清零
initial_state: true
trigger:
platform: time
at: 03:00:00
action:
service: counter.reset
target:
entity_id: counter.livingroom_counter
|
计数器增加的自动化,人体传感器从off到on计数器就+1
1
2
3
4
5
6
7
8
9
10
11
| - alias: 有人经过计数器增加
initial_state: true
trigger:
platform: state
entity_id: binary_sensor.motion_sensor_158d000121c2c4
from: 'off'
to: 'on'
action:
service: counter.increment
target:
entity_id: counter.livingroom_counter
|
上面说清楚了,起床就自动化就很简单了,计数器从0到1的时候就是有人起床啦,触发播报脚本即可
1
2
3
4
5
6
7
8
9
10
| - alias: 起床播报
initial_state: true
trigger:
platform: state
entity_id: counter.livingroom_counter
to: '1'
action:
service: script.toggle
target:
entity_id: script.send_getup_broadcast
|
相关链接(侵删)
和风天气(heweather) HomeAssistant插件使用说明(2023年11月重大更新)
HomeAssistant 和风天气插件的自动化分享
=================我是分割线=================
欢迎到公众号来唠嗑:


